Getting Started - Example Workflows
If you have beeflow installed and the components running, you are ready to try out a BEE workflow.
It is not necessary to clone the BEE repository to run BEE. However, in order to have access to the files needed for the examples you will need a copy of the repository. If you have not already cloned it, run the following:
git clone https://github.com/lanl/BEE.git
I will refer to the location of your local copy as $BEE_PATH.
Simple multi-step example (without container)
cat-grep-tar workflow
The cat-grep-tar workflow is a rather simple workflow that demonstrates BEE’s
ability to work with multiple tasks, including those that can run at the same
time. The first step, or task, does a simple cat of an input file. The
stdout of this step is then passed as a file to two steps that grep for
different words within the text. These can both be run in parallel. The final
step takes the output files from the grep step and stores these into a tarball.
These input values are stored in a YAML file. As an example we have a default
input.yml file that can be used. It contains:
input_file: lorem.txt
word0: Vivamus
word1: pulvinar
tarball_fname: out.tgz
This uses a sample from the classic Lorem Ipsum text and does a grep for two
random words in the file. Finally an output tarball is generated with the name
out.tgz.
Before running, make sure to take a look at the CWL files that form the
workflow. There is a main workflow.cwl file that specifies the workflow,
inputs and outputs, and all of the workflow steps or tasks. Note
that each of these steps specifies their step-specific inputs and outputs, as
well as a run option, that in this case points to the CWL file that
further specifies how to execute the command. When creating a
workflow, you will need to create a similar workflow structure, explicitly list
dependencies between steps and also describe how to run the steps on the
system. For more information on writing a workflow please refer to the
Common Workflow Language User Guide, but note that BEE doesn’t currently
support all features.
To run our simple example, you’ll want to first create a workdir for the
workflow and copy over the input file lorem.txt. I’ll refer to this path in
code samples as $WORKDIR_PATH. Note that this $WORKDIR_PATH should be
located outside of the BEE repo. For example, it could be in your home
directory $HOME. The workdir is where all of your input files should be
stored before starting a workflow, as this will be the current working directory
of all steps that are run. Output from each step will also be stored here.
Once this workdir has been created and beeflow has been started, you are now ready to package and submit the workflow. This can be done with the following sequence of commands:
cd $WORKDIR_PATH
cp $BEE_PATH/examples/cat-grep-tar/lorem.txt .
beeflow package $BEE_PATH/examples/cat-grep-tar . # Tars up the workflow
beeflow submit $NAME ./cat-grep-tar.tgz workflow.cwl input.yml $WORKDIR_PATH # Now submit the workflow
This first command packages the workflow into a tarball, which makes it easy to pass everything over to the Workflow Manager and finally submits the workflow, specifying a name, the tarball path, the location of the CWL file, the yaml file and finally the workflow path containing lorem.txt. If you copy and paste make sure to change $NAME to a name of your choice, $BEE_PATH to the path of the BEE repo, and $WORKDIR_PATH to the proper path that was created earlier. The submit command should have produced a short ID of 6-7 characters.
Alternatively, you can skip packaging the workflow and submit using the path of the directory for the example by:
cd $WORKDIR_PATH
cp -r $BEE_PATH/examples/cat-grep-tar . #Copy example directory
cp cat-grep-tar/lorem.txt .
beeflow submit $NAME cat-grep-tar cat-grep-tar/workflow.cwl cat-grep-tar/input.yml $WORKDIR_PATH # Submits the workflow
This will automatically do the packaging and create an archive in the background to be submitted.
Now the workflow should start up. While the workflow is running you can check
the status by running a beeflow query $ID. On completion, each step
should be in a COMPLETED state. If you forgot to copy the lorem.txt file
to $WORKDIR_PATH the cat step will be in the FAILED state and the error will
be in the cat.err file.
After all steps have finished, you should see a number of files that have been created in your $WORKDIR_PATH:
cat.txt
cat.err
lorem.txt
occur0.txt
occur1.txt
out.tgz
The cat.txt file is just a duplicate of lorem.txt and cat.err is
the stderr output from the cat step. The occur0.txt and occur1.txt
files were produced respectively by the grep0 and grep1 steps.
out.tgz was produced by the final tar step. For this example, the cat step
and the tar steps are not really necessary, since the file already exists in
the input directory and on completion you don’t necessarily need to have both
of the occur*.txt files in a tarball. However, this is a useful sample of
the features a real-world workflow might need to use. For instance, the first
step might be producing some sort of output from a calculation, instead of just
copying the input to the output. The last step may also do some more processing
to produce some sort of final file. If necessary, there can be many more
processing steps than this simple example shows.
CLAMR workflow examples (containerized application)
CLAMR is an open source LANL mini-app that simulates shallow water equations. CLAMR performs hydrodynamic cell-based adaptive mesh refinement (AMR).
The CLAMR workflow examples we introduce here are simple two step workflows that run a CLAMR simulation in step one, producing graphic images from periodic time steps. Then, FFMPEG is run in step two to make a movie visualizing the progression of the simulation. We use these workflows for some of our integration tests and they are practical examples to help you start using BEE. The differences in the CLAMR workflows are the way the containers are used.
CLAMR build workflow the container will be built
CLAMR copy workflow, the container will be copied from a specified path to the container_archive directory (specified in bee.conf)
CLAMR use workflow uses the container specified
CLAMR build workflow
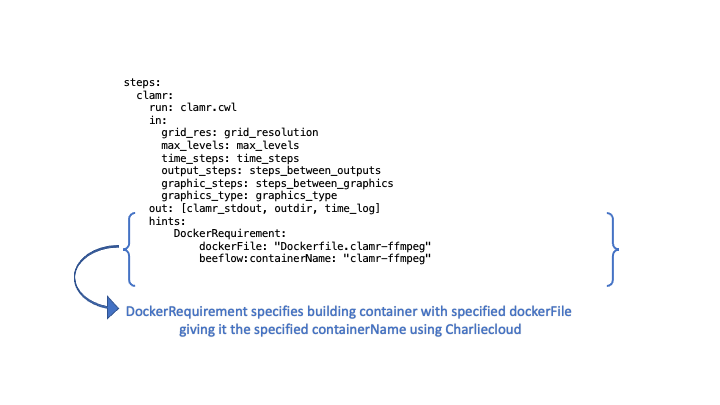
The workflow is in <path to BEE>/examples/clamr-ffmpeg-build. You may want to explore the cwl files to understand the workflow specification for the example. The specification for the build of clamr in this example is for X86 hardware. Below is the clamr step with the DockerRequirement in hints that specifies to build a container from a dockerfile using Charliecloud (the container runtime specified in the configuration file).
CWL for clamr step in examples/clamr-ffmpeg-build/clamr_wf.cwl
Next we’ll submit the CLAMR workflow from a directory of your choosing, referred to as $WORKDIR_PATH, on the same front-end where you started the components. If you have not started the beeflow components, refer to Installation Guide.
In this example, instead of packaging up the workflow cwl files directory, we’ve just listed the full path. This should auto-detect the directory and package it for you.
cd $WORKDIR_PATH
cp -r $BEE_PATH/examples/clamr-ffmpeg-build .
beeflow submit clamr-example clamr-ffmpeg-build clamr-ffmpeg-build/clamr_wf.cwl clamr-ffmpeg-build/clamr_job.yml $WORKDIR_PATH
Output:
Detected directory instead of packaged workflow. Packaging Directory...
Package clamr-ffmpeg-build.tgz created successfully
Workflow submitted! Your workflow id is b94ff7.
Started workflow!
If this is the first time you’ve run the workflow it will build the container
and create a Charliecloud image tarball. This process will be done before
running the workflow tasks as jobs and may take a few minutes. The first task
will be in the ready state, until the container is built. This is the
pre-processing building phase and will only be performed once. In this example
both steps use the container that is built in the pre-processing stage. Once
the build has been completed the Charliecloud image will be in the container
archive location specified in the builder section of the bee configuration
file. You can list contents of the configuration file using beeflow config show.
The status of the workflow will progress to completion and can be queried as shown:
Check the status:
beeflow query fce80d
Output:
Running
clamr--READY
ffmpeg--WAITING
As the clamr task goes from READY to RUNNING, let’s check the status again:
beeflow query fce80d
Output:
Running
clamr--RUNNING
ffmpeg--WAITING
When the workflow has completed:
beeflow query fce80d
Output:
Archived
clamr--COMPLETED
ffmpeg--COMPLETED
The archived workflow with associated job outputs will be in the
bee_workdir. See the default section of your configuration file (to list
configuration file contents run beeflow config show). This workflow also produces
output from CLAMR and ffmpeg in the directory where you submitted the workflow :
graphics_output - a directory containing the graphics png files.
total_execution_time.log - log generated by CLAMR
CLAMR_movie.mp4 - The final movie
clamr_stdout.out - standard output from clamr step
This example uses Charliecloud. The image will still be in the Charliecloud
cache. You can list what is in the cache using ch-image list. If there are
no other builds, the result should be:
ch-image list
clamr-ffmpeg
debian:stable-slim
There are other commands for resetting (clearing out all images) and deleting
an image. Type ch-image --help more information consult the Charliecloud
documentation.
CLAMR copy workflow
Add LANL example here copying /usr/projects/BEE/clamr/clamr-toss …
CLAMR use workflow
Add LANL example here using /usr/projects/BEE/clamr/clamr-toss …