Conduit MCP Server Operations Guide
This guide covers deploying the Conduit MCP (Model Context Protocol) server and connecting MCP clients either directly or through a LiteLLM MCP gateway.
Deployment Options
Conduit MCP can be deployed in two primary ways:
-
Direct MCP access
MCP clients connect directly to the Conduit MCP server and authenticate with the configured OAuth/OIDC provider. -
LiteLLM MCP Gateway
MCP clients connect to LiteLLM, which controls access to the Conduit MCP server and forwards the user's OAuth identity to Conduit.
For LiteLLM deployments, two OAuth methods are confirmed supported:
- Delegated OAuth — preferred for centrally managed or OAuth-only MCP clients.
- Authorization Code — useful when each user can configure their own LiteLLM virtual key.
Option 1: Direct MCP Access
In the direct configuration, MCP clients connect directly to Conduit:
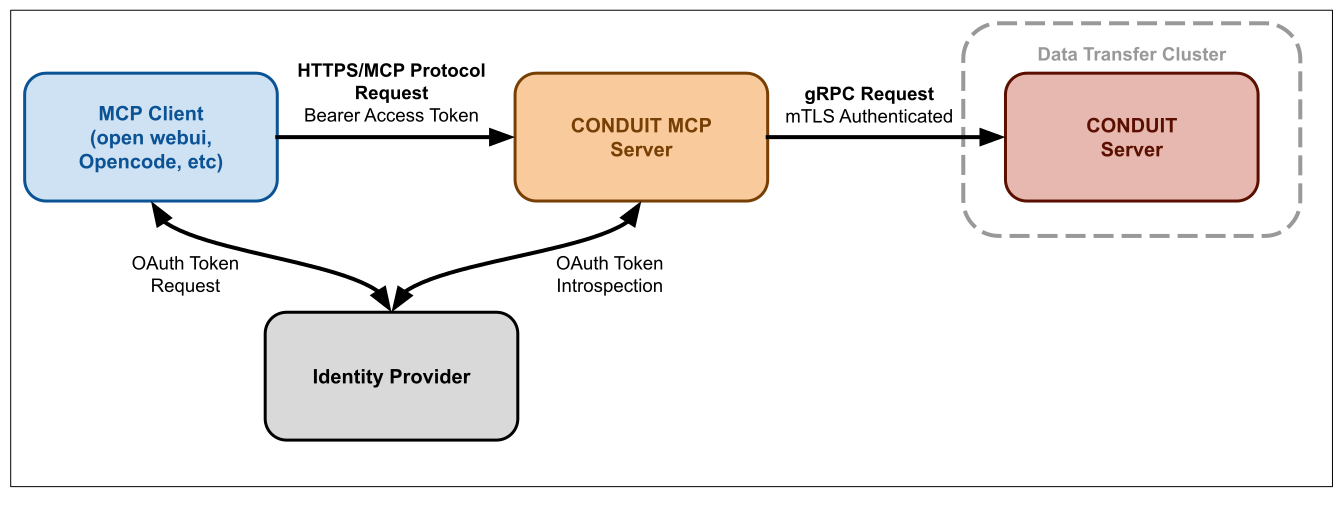
Conduit validates the OAuth token against the configured identity provider and uses the authenticated username when making requests to Conduit.
Conduit MCP Configuration
See the full reference config for all available settings.
# Connection to Conduit server
conduit:
  ip: conduit-server.example.com
  port: 23456
  ca: /path/to/conduit-ca.pem
  request-timeout: 30s

# MCP server settings
server:
  ip: 0.0.0.0
  port: 8081
  public-url: "https://mcp.example.com"
  metadata-path: /.well-known/oauth-protected-resource
  http:
    allowed-origins:
      - "https://client1.example.com"
      - "https://client2.example.com"

# OAuth authentication
oauth:
  discovery-url: "https://auth.example.com/.well-known/openid-configuration"
  ca: /path/to/oauth-ca.pem
  username-claims:
    - preferred_username
    - email
  # Optional: introspection-auth-method: client_secret_basic

# Client configuration for connecting the mcp server to Conduit
client:
  cert: /path/to/client-cert.pem
  key: /path/to/client-key.pem

# Optional: enable debug logging
debug: true
OAuth settings can also be provided through environment variables:
# OAuth Configuration
CONDUIT_MCP_OAUTH_ISSUER=https://auth.example.com
CONDUIT_MCP_OAUTH_CLIENT_ID=your-client-id
CONDUIT_MCP_OAUTH_CLIENT_SECRET=your-client-secret
CONDUIT_MCP_OAUTH_INTROSPECTION_URL=https://auth.example.com/oauth/v2/introspect
CONDUIT_MCP_OAUTH_USERINFO_URL=https://auth.example.com/oidc/v1/userinfo

# Server Configuration
CONDUIT_MCP_SERVER_PUBLIC_URL=https://mcp.example.com
Environment variables take precedence over configuration file values for OAuth settings.
Clients connect directly to:
https://mcp.example.com/mcp
Use this deployment when a gateway is not needed and MCP clients can authenticate directly with the OAuth provider protecting Conduit.
Option 2: LiteLLM MCP Gateway
LiteLLM can be placed in front of Conduit to provide a central MCP gateway:
Clients connect to:
https://litellm.example.com/conduit/mcp
instead of connecting directly to the Conduit MCP server.
Conduit continues to validate OAuth tokens from the configured identity provider. LiteLLM does not replace Conduit's OAuth validation.
The Conduit MCP server can remain configured the same way as in the direct deployment.
LiteLLM Access Control
The Conduit MCP server should normally require explicit access:
allow_all_keys: false
Access can then be granted through LiteLLM user, team, or key permissions.
For example:
{
  "object_permission": {
    "mcp_servers": ["conduit"]
  }
}
Delegated OAuth
Delegated OAuth is the preferred method for most centrally managed MCP deployments.
It is especially useful when:
- an administrator registers the MCP server once for many users;
- users should not manage LiteLLM API keys themselves;
- the MCP client supports interactive OAuth;
- LiteLLM should still apply per-user or per-team MCP permissions.
LiteLLM Configuration
mcp_servers:
  conduit:
    url: "https://mcp.internal.example.com/mcp"
    transport: "http"
    description: "Conduit MCP server"

    auth_type: oauth_delegate
    dcr_bridge: true

    allow_all_keys: false
With the DCR bridge enabled, clients only need the LiteLLM MCP URL:
https://litellm.example.com/conduit/mcp
The client performs OAuth discovery and dynamic client registration against LiteLLM.
The flow is:
MCP Client
    |
    | OAuth discovery / registration
    v
LiteLLM
    |
    | identify user
    v
LiteLLM Login / SSO
    |
    | upstream OAuth
    v
OAuth Provider
    |
    | user token
    v
LiteLLM
    |
    | LiteLLM access control
    | forwards user identity
    v
Conduit MCP
LiteLLM must have a browser login mechanism available so it can associate the MCP authorization with a LiteLLM user.
For deployments using an existing OAuth/OIDC provider, that provider can also be used for LiteLLM SSO.
The LiteLLM login application and Conduit OAuth application may be separate OAuth registrations:
LiteLLM SSO application
    identifies the user to LiteLLM

Conduit OAuth application
    obtains the token accepted by Conduit
Reverse Proxy Configuration
When LiteLLM is behind a reverse proxy, configure its externally visible URL:
PROXY_BASE_URL=https://litellm.example.com
If a web-based MCP client uses an OAuth callback on another origin, explicitly allow that origin:
MCP_TRUSTED_REDIRECT_ORIGINS=client.example.com
For example, a centrally configured web client may use:
https://client.example.com/oauth/clients/mcp:conduit/callback
When to Use Delegated OAuth
Use delegated OAuth when:
- MCP connections are managed centrally;
- users cannot configure separate LiteLLM virtual keys;
- the client supports OAuth and dynamic registration;
- LiteLLM must distinguish users and enforce per-user or per-team access.
This is generally the preferred option for multi-user web applications.
Authorization Code
The authorization-code method is simpler when each user can configure their own LiteLLM virtual key.
LiteLLM Configuration
mcp_servers:
  conduit:
    url: "https://mcp.internal.example.com/mcp"
    transport: "http"
    description: "Conduit MCP server"

    auth_type: oauth2
    oauth2_flow: authorization_code
    per_server_oauth_discovery: true

    client_id: os.environ/CONDUIT_OAUTH_CLIENT_ID
    client_secret: os.environ/CONDUIT_OAUTH_CLIENT_SECRET

    authorization_url: "https://auth.example.com/oauth/v2/authorize"
    token_url: "https://auth.example.com/oauth/v2/token"

    scopes:
      - openid
      - profile
      - email
      - offline_access

    allow_all_keys: false
The OAuth provider should allow LiteLLM's callback:
https://litellm.example.com/callback
The MCP client sends both a LiteLLM virtual key and the OAuth credential:
x-litellm-api-key: Bearer <LiteLLM virtual key>
Authorization: Bearer <OAuth access token>
Use x-litellm-api-key for the LiteLLM key so that the standard Authorization header remains available for OAuth.
The flow is:
MCP Client
    |
    | LiteLLM virtual key
    v
LiteLLM
    |
    | OAuth authorization
    v
OAuth Provider
    |
    | user access token
    v
LiteLLM
    |
    | forwards user token
    v
Conduit MCP
LiteLLM stores the upstream OAuth credential using the LiteLLM user associated with the virtual key.
Because of this, each user should have their own LiteLLM identity and virtual key.
Do not share a user-owned virtual key between multiple users. If several users share the same LiteLLM user identity, their upstream OAuth identity can also be shared for that MCP server.
When to Use Authorization Code
Use authorization code when:
- each user controls their own MCP client configuration;
- each user can receive their own LiteLLM virtual key;
- clients can send both the LiteLLM key and OAuth credential;
- a simpler gateway authentication model is preferred.
This is a good fit for developer-oriented MCP clients where users individually configure their MCP servers.
Running the Conduit MCP Server
Prerequisites
- Conduit server running and accessible
- OAuth/OIDC identity provider configured
- mTLS certificates for connecting the MCP server to Conduit (see cert generation for details)
Command Line
Using a configuration file:
conduit-mcp --config /path/to/config.yaml
Enable debug logging:
conduit-mcp --config /path/to/config.yaml --debug
Systemd
Example systemd unit:
[Unit]
Description=Conduit MCP Server
Documentation=https://github.com/lanl/conduit
After=network-online.target local-fs.target remote-fs.target time-sync.target
Wants=network-online.target local-fs.target remote-fs.target time-sync.target

[Service]
Type=simple
ExecStart=/usr/local/bin/conduit-mcp --config /etc/conduit/conduit-mcp-config.yaml
Restart=on-failure
RestartSec=5s
KillMode=mixed
KillSignal=SIGTERM
TimeoutStopSec=5h
SendSIGKILL=yes

[Install]
WantedBy=multi-user.target
Enable and start the service:
sudo systemctl daemon-reload
sudo systemctl enable conduit-mcp
sudo systemctl start conduit-mcp
sudo systemctl status conduit-mcp
Docker
Build the image:
# Build the image
docker build -f docker/Dockerfile.mcp -t conduit-mcp:latest .
Run the container:
docker run -d \
  --name conduit-mcp \
  -p 8081:8081 \
  -v /path/to/config.yaml:/etc/conduit/conduit-mcp-config.yaml:ro \
  -v /path/to/certs:/etc/conduit/keys:ro \
  conduit-mcp:latest